maandag 08 maart 2010 19:08
|
|
Due to the many questions I get regarding coil gun designs, I decided to create this Coil Gun FAQ. This article is mostly about single stage coil guns and will be under constant change. Questions and answers will be placed here and comments/suggestions are welcome. |
First I must point out that I'm not an expert at this area, I just understand enough of the Principle's to get it working.
I will start this article by placing random questions and answers, later I will rewrite it into something more readable. Different conversations are separated by a row of ---'s, formalities like thanks for your help and you're welcome are left out for a better overview. These are the questions I received over the last few months, regarding the coilmaster mark1.
The schematic for this gun was slightly altered, Download the schematic (pdf)
-----------------------------------------------------------------------------
Q: Well i am building my first one, but i cant find anyware how to make a coil for coil gun.
I need to know induction, it no need to be exact, but if u tell me some number I'll be very happy.
here are my specs:
-One coil
-Cap: 20 000uF
-Voltage: 315VDC
-Thyristor switching 1600V/160A
-Projectile: 30x7mm
-Weight: about 2g
A: you have enough capacitors, that can handle almost 1000 Joule. but your projectile has a very small diameter (compared to mine). therefor you need multiple stages to transfer the energy effeciently. a single coil simply wont do it, not enough material to magnetize.
the coils themselves dont have to be calculated very precise, the coil parameters doesnt seem to have much influence. but i can give you a few guidelines:
use a thick wire (1.5-2 mm), to reduce ohmic losses
the coil length should be around the same length as the projectile
for 300-400 volt use around 100 windings.
you can also just make a coil and change the amount of capacitors to 'tune' it, thats what i did with my gun. i have about 10 more of these capacitors laying around, but using more would actually reduce muzzle speed.
Q: guess i will need an antiparalell diode on my caps, cause i have blown my 25A bridge :D , i used too big coil. So now i will make bigger projectile, and new coil. i've got two 10 000uF caps, so i will tune by adding and decreseng coil turns.
A: yeah tuning with 2 capacitos is difficult;) tuning with the coil is also possible, you can wind a coil of 6 seperate layers and put them in series to see how many layers work best.
-----------------------------------------------------------------------------
Q: Does stranded wire matter for the coil gun does it have to be solid wire? also if i have a 300 uf disposable camera capacitor should i use 22 gauge only? or whast would be the proper specification.
A: there is no significant difference between stranded or solid, both shoud work fine but solid looks better and winds more easily. 22 gauge is a bit thin, but it will probably work. I think 18-16 gauge would be best, depends on your project size.
Q: i also wanted to now where can i get higher capacity capacitors..? because i was thinking of using 18gauge wire mixed with 12 gauge wires any tips on what kind ofcapacitor i should get?
A: I think the capacitor size depends of the coil and projectile size. for example a higher capacity on my gun would actually reduce muzzle speed, so you really have to experiment a little.
I would say use capacitors with 300-400V and start with around 500uF, increase or decrease the capacity and see what works best. Use a thyristor to discharge the caps.
-----------------------------------------------------------------------------
Q: 1) The capacitors you are using are quite large. I bought much smaller ones with the larger capacitance value, totaling 9400 uf (in parallel of course). However, the voltage rating is only 70 V (DC) Is it possible to add another capacitor, with a capacitance of 0.0047 uF with a voltage rating of 500 V to raise the total voltage to 570 V and the total capacitance to 9400.0047 uF? I am just trying to increase the total voltage it can handle, not increase the capacitance with the third capacitor. I also realize, that the charge time will be longer since i am using a larger capacitors than you are.
2) My knowledge of electricity, is small, and only from a physics course in school. I know there is a formula to calculate magnetic force from a solenoid, but how can I calculate the ampere produced when the capacitors release their "energy"? And how do i calculate for the multiple layers of wires like yours has? (I realize there is information on your website, but I do not understand it. *language barrier*)
3) Without using the light bulb, but using the voltage meter, how do you know when the capacitors are fully charged?
4) Did you use an AC to DC converter? If so, how much is the voltage after it is converted?
A: The charge time depends on the value of the charging resistor, if I had the right one charging would take max 2 seconds.
1 What youre trying to achieve is not possible, the tension would indeed increase if you put them in series, but the total capacity would be smaller as the lowest capacitor value in the setup. Its like putting 2 resistors in parallel, the replacement resistor is lower than the lowest value of the resistors.
My capacitors are indeed quite big (and at least 10 years old), and there are much smaller versions available now. The energy inside a capacitor is determined by its capacity and the tension, however this is not linear. If you increase the tension, the energy (Joules) goes up in a 2 squire.
Example, my capacitors have 8800uf and 400v,
The energy inside is 0.5*Capacity(F)*tension(V)^2
=0,5*(8800*10^-6)*(400^2)= 704J
Jour capacitor bank is:
=0,5*(9400*10^-6)*(70^2)= 23J
You see the tension is a very important factor, the energy in your capacitor bank is about 30 times lower than the one Im using, even though your capacity value is higher.
2 I know there is a formula for it, but I have never used it. When I build this it was more like trial and error: ). The coil I used is a standard coil I found somewhere, I just put a plastic tube in it and started experimenting with different capacitor values and tensions. It fired actually slower when I use more than 4 of these capacitors (I have 12).
3 the voltmeter indicates the tension on the capacitor, when this reaches the max value the capacitors are made for they are full.
4 I did use an ac-dc converter, the tension you get out of ac is root2 *ac tension.
Im using 230v, 230* 1.414 = 325.3 V to reach 400v I use a variable transformer witch increases the ac voltage to about 280V.
Q: What if I put my capacitors in parallel. Than, the capacitance would add up, but would the voltage also add up?
And lastly, where did you get your rounds (the metal slugs that you shoot)? And what is the diameter of your barrel?
A: if you put capacitors in parallel, then the tension keeps the same as a single capacitor. if you put them in series the tension increases but the capacity decreases rapidly. the energy that fits in each capacitor stays the same.
i creates my rounds from a steel rod, and used a turntable to get the right diameter and to make nice round tips. my barrel is 16mm outside and 13mm inside (standard pvc electrical tubing), the round itself 12mm.
most people tell me that you need smaller/lighter objects, so you can get higher speeds. i think youd better use something in the range of 5-9mm rounds. you can use standard bolts or nails as projectiles. cut them to the right length.
it's important that the coil is as close as possible to the projectile, so use a thin barrel.
-----------------------------------------------------------------------------
Q: First i would like to ask you how you made the reloading system.Something else i cant quite understand is to make a trigger system,from what I have read a simple button wont work.Finaly I just want your oppinion on what I should use as a barrel and how I should make it.
A: i assume that you looked at the schematic at: http://hackedgadgets.com/2009/05/07/mv-coilmaster-mark1-coil-gun/
the reloading system is quite simple, gravity pulls the bullets down. there is a hole where only one bullet fits trough. the coil is placed in front of the hole and pulls the bullet out of the clip and launches it at the same time.
for the trigger you need a power fet or a thyristor (last one is the easyest). when you look at the schematic you see the thyristor is activated by a relais contact, but this activation switch can be very small since the currents dont go over 0.3A (a very short pulse). so any switch for that will do.
the barrel shoul be a non magnetic material, preferably plastic, in any case not aluminum (wich is heavily repelled by strong magnetic fields) i used a standard electrical installation 16mm pvc tube, but you really need something smaller.
-----------------------------------------------------------------------------
Q: Do you have instructions for how to make the coil gun? I'm not an electrical whiz, but I understand how this thing works in a rudimentary way that I was wondering if I could build one with some modifications.
I think 5mm ball bearings would be a better choice of ammunition using a continuous pulse wave through the coil (charge up capacitors in sequence). Think of it a machine gun with BB ammo, the effect of sending 100 projectiles with the same energy requirements as the one slug that weighed more. The velocity would be vastly improved as well. I'd be glad to pursue experimentation down this road with your assistance (or simply detailed photos of the guts/components with labels for parts and what they do).
A: I don’t have any build instructions, I just make it up when I go..
I just wanted big projectiles;) velocity would greatly increase when you have lighter projectiles. Bb like bullets are great for aerodynamic, but less efficient to fire I think. Timing becomes more critical unless the projectiles are longer (also more material to magnetize).
My gun is actually quite simple, no real complicated electronics. I send you 2 schematics, one is of my coilgun and the other is just the basic firing part. You only need that and some form of charging system
-----------------------------------------------------------------------------
Q: the schematics that you have online (here) are too vague to build. Do you think you could clarify and label the parts in more detail so I could build it? For instance, what type of switches are S1-S4 , what are the ratings for the diodes you used, and what are K1 and K2?
While I know I have access to all these parts (I have a lot of spare parts), excluding the IC which I can get online, I wouldn't know which ones to use. Could you please help me with your schematics? Also, did you really just use one photo flash charger for all the capacitors? You must have used something else because 6volts burns out all of the chargers I have.
A: Switches 1-3 are standard power switches, the 3 switches you see at the side of the gun. S4 is a micro switch located behind the trigger. The diodes I used can be any high speed type, I used the mur 860 from one of my teslacoils. They are just there to prevent that the capacitors charge negatively from the induction of the coil.
K1 and k2 are Relays with double contacts. The voltage regulator is used because I only had 5v relays, if you use 9v relays you won’t need the voltage regulator ic.
The photo flash charger I used is made for 6v and is from a large external flash unit, it pulls over 8 amps from the batteries.
-----------------------------------------------------------------------------
Q: I have seen these massive audio capacitors (some around 5 farads, but many in the 1.2-1.5 range) and was wondering how one could modify this circuit to handle that kind of capacitor. Most that I have seen are rated at 20/24 volts... one could attach them in series for a doubling of voltage for a corresponding decrease in capacitance... that would still be .75 farads (assuming 1.5 farads each)... which is 85 times larger than the capacitance you used in this circuit...If I attached more of them in series I could get an even bigger voltage and a correspondingly steeper discharge curve that would give me much much much more current... I might even be able to make a significantly larger coil... I would be able to eliminate the volt meter as these capacitors have volt meters built into them... my only concern really is what mods (if any) would I need to make to R2, D6, and T1... I see that you have it relay isolated so there isn't really too much that I could end up frying other than the components I already listed... and I definitely would not be using a photo flash charger to charge this thing... actually I'd prolly end up making it bolt action with replaceable capacitor banks and charge them with mains or I'd build some kind of portable charger that could charge them in less than a day... With capacitors this large I will need to be VERY careful so as to not introducing myself into a circuit with one of them... If you have any suggestions I'd be very happy to hear them... and I wont be disappointed if you say that it is inadvisable to use a capacitor that large.
I completely forgot about voltage considerations... If I use capacitors of the voltage I previously mentioned I prolly wont get that great of a device... Woops... I feel kinda stupid now... yeah your caps charged to 300v so If I wanted 300v I would need 15 of those capacitors... definitely a time to use ebay... but it would be 11 times the capacitance... which hopefully yields faster projectiles... might need a heat sink on the coil to dissipate heat.... I was meaning to ask was your choice of projectile size optimized to the magnetic field of the coil? Did those projectiles reach their saturation point?
A: The energy inside the capacitors can be calculated by: 0.5 * capacity * voltage^2
This tells me that the energy inside a combined capacitor of 750mF and 48v is about 864 Joule, which is only slightly higher than my capacitor bank (704J @ 400v) . Furthermore, capacitors with a high capacity usually have a high internal resistance (because of the capacitor plate film is rolled in a coil) so you’d rather be putting them in parallel than in series. This means higher current, less turns on your coil. So you need a very powerful thyristor. Higher tension (+-300V) capacitors would be more suitable I think.
A heat sink on the coil would probably influence the magnetic field, so I don’t know if this is a good idea. You might want to think about using a fan to create an airflow… this would be a great improvement as well (my coil is inside a closed compartment so it takes forever to cool down).
My projectiles are optimized to the coil (which is a standard one I had laying around). I do not think they are saturated, because other coilguns have higher velocities. My theory is that the saturation is more speed related than weight related. But in my case adding more capacitors didn’t do me much good, I ended up slowing the projectile down, and even fire it in the opposite direction… so it’s definitely a finetuning between the capacitors, coil and projectile.
-----------------------------------------------------------------------------
Q: Hi, I'm a high school student and I am building a coil gun to test the speeds of various ferromagnetic metals for my school's science fair. Your coilgun was impressive! Would you mind reviewing my design for a seven stage coilgun in the attached JPG file and give me any suggestions on its design ( could you first tell me if my current design will work at all)? I would be very grateful if you responded within the next two or three days.
A: I’m not quite sure i understand your schematic, in any case the charged capacitor has to be switched parallel to the coil to discharge. I don’t see how that’s done in your schematic. If youre planning to use a battery on a low voltage (12-24v) you might be better off using no capacitors at all, and use fets or power transistors to directly switch the battery over the coil. You only need to find a way to trigger each coil at the right time.
I recommend first using one coil, perfect it and then start adding stages, perfect everyone before adding the next.
I hope this information is useful to you, if you have any more questions jeust ask them:)
Q: Sorry about that that picture was too general. Maybe these close ups will help clarify things
And just to be sure, does a transistor works the REVERSE way a fuse does? (When an electric current is introduced, it COMPLETES another circut)
A: A fuse is used to switch off an over current(safety), a transistor is used to switch an electrical current (on/off) (not for safety).
In your schematic the firing position obviously works fine, I still don’t understand the charging position. But since there are no major currents trough the charging circuit that’s no problem. I assume you know that the polarity is very important with electrolytic capacitors.
How do you plan on timing the other stages?
Q: I don't exactly know. My plan was that by the time the electricity made it to the transistor (bridging the circut for the next stage) the projectile will have made it to at least the halfwaypoint between the two stages, and the capacitor in the previous stage would have finished dumping its charge through the coils and stopped pulling on the projectile. The following stages are pretty much identical to the first stage with the exception that all of the stages after the first stage have a transistor in the place that the starting switch was in the first stage. The wire in the First Stage Schematic that extends to the right off the page leads to the second stage's "switch" (transistor) completing the second stage's circut so that the second stage's capacitor releases it's charge. I intend to have this layout in each of the six successive stages after the first one, until the projectile leaves the barrel.
A: The electricity makes it instantly to the transistor, which would open all coils at practical the same time. I don’t think that will work, plus if it did the timing would be incredibly difficult to get just right.
I have seen other designs where de projectile itself pushes a switch or acting as a switch when entering each stage, you might want to try that. A more difficult design is placing optical sensors for each coil, you need electronics for this but the advantage of this is that the projectile doesn’t get slowed down by pushing switches.
Q: optical sensors, hmmm... are they particularly expensive? Could i buy six at one time for under 15 USD?
A: Probably, I think they are about 1-2 dollar each. You could make them yourself with IR led’s and IR receivers which is even cheaper (and probably better). Or you can use ones like I did in my speedometer project http://www.megavolts.nl/index.php/en/projects/geweren/116-mv-speedometer (but I had to replace the original leds because they weren’t bright enough).
Q: So, if I were to incorporate Infrared sensors into my design, could I rig each one to each transistor, so that the projectile entering the IR sensor's light beam activates the transistor's circut closing capability for each successive stage of the cannon? (that is, if that's how IR sensors work, I'm not entirely sure)
Also, will the electromagnetic fields generated by the coils cause any interference with this additional electrical hardware?
A: Yes that’s the general idea. But you probably need a little more electronics to make the infrared sensor fire the transistor. The electromagnetic field shouldn’t influence the sensors signal.
Q: Do you mind explaining to me what you mean by " a little more electronics"? I assumed that IR sensors are built so that when the beam is broken, an electrical circut is closed, making motion sensors ideal for activating alarm systems in high security facilities.
A: That depends on what type sensors you are using. I referred to the simplest, fastest and cheapest kind. Here is an example http://www.circuitsonline.net/forum/view/60057
With that output you can switch the transistor (add a resistor to the base). But you should know that I haven’t build this so I won’t be able to give you much feedback.
Q: I can't read german, but I am taking your advice and I am going to be buying some cheap IR emitters I found online and use those for the switching process. Why do I need resistors? Don't I need as much current I can get to contribute to the magnetic flux to pull the projectile?
A: There aren’t any resistors in your primary circuit, but you need resistors to protect the smaller components. Also if you don’t add a resistor to the base of your transistor it will fry out after a few shots. All currents are very low +-50mA, if you don’t use resistors the IR led burns out right away.
If you buy the IR leds and detectors separately, pay attention that they use the same wavelength (example 950nm).
Q: Thanks so much for your help sir. I can actually see the cannon coming together. But i have a few more questions to ask. I've been looking for a while but I can't seem to find a simple enough schematic for an active Infrared motion detector. I want a circut where I have an IR emitter across from an IR reciever (across the diameter of the barrel, obviously) , and the IR emitter is continuously emitting a beam to the reciever, and when the projectile intercepts the beam, an electrical current is produced that travels to the stage's transistor. I also need an LED placed on the circut somewhere between the point where the electrical current is produced and the stage's transistor, so that I can know when the IR detector beam for that stage has been breached.
The schematics I have found online use devices that I'm unfamiliar with (such as an LM 555), or look too complex for me to repeat six times, and I'm really trying to stay away from using printed circut boards, but I will consider them if I have to.
A: No problem, i found a schematic that will probably do the job: http://www.circuitsonline.net/schakelingen/16/modelbouw/eenvoudige-lichtsluis.html use google translate to translate the page.
When your source voltage is constant (12v) you can drop d1, d2, t1 and r1. (calculate r2 for the IR led you are using and r3 for the receiver). When the light is interrupted the led wil ligt up, you can use this signal for your power stage (use a npn transistor) 100ma max.
Q: I'm going to be utilizing 25V 22,000 microFarad electrolytic capacitors in each stage, so is the transistor you suggested (100mA NPN transistor) going to be able to handle 25V without a resistor? If not, can you suggest one that can, or at least specifications I need to look out for? I'm looking to get as much current into the coils as i can.
A: The bc547 can handle up to 50V, you use the output of this transistor to power your end stage (like a thyristor or fet or power transistor). If you want to dump the entire capacitor charge on the coil then you might want to use a thyristor (which are easier and can carry more current). I just thought of a schematic that will probably be much easier to make and work just as well (see appendix).
A small switch will trigger the gate of a thyristor, the thyristor will stay ‘on’ until the entire capacitor is empty. There will be almost no current trough the switch itself, should you take a very small switch it will probably not affect the speed of the projectile. Repeat this for every coil stage.
-----------------------------------------------------------------------------
Q: Hello, my friend and I are trying to replicate a coil gun similar to the one you have created. We are trying to figure out better techniques in making a coil gun more effective. I was wondering if you have heard of using a ring type projectile. Instead of loading a bullet inside of a barrel, a ring projectile would sit on the outside of the barrel. Though we have not figured out how to keep the ring steady in its trajectory. Do you believe this would be a better method?
A: I haven't thought of this when I built my gun, but I heard of this way recently.
The projectile must slide over the coil, this means either a small coil or a large projectile. A tube would still be useful for guidance of the projectile, you might think of letting the projectile slide over the outside of the tube? You can also try an aluminum ring partially slided over the coil, the magnetic field pushes aluminum away and attracts iron.
I haven't tried this but it certainly seems possible to me, you just have to experiment a little.
-----------------------------------------------------------------------------
Q: I have juste a few question about it (beacuase i am building one for a science project on the magnetic forces and their use).
I have only a few knowledge about electronics for the moment (capacitors, coils and basic stuff).
I was wondering what the upper right part of the schematic refered to (sorry my english must be verry hard to read XD).Is it for a SCR switch? What are the use of the relays?
You haven't any problems of charge while using the AC and the diodes (the curent must still varriate)?What is the tension of your AC current (I am living in france).
How long does it takes to charge the capacitors whit the AA battery? (I think that for my model i will use a 18Volt battery designed for garden working).
I have also heard that some people use microwaves circuit instead of the photo flash charger.But i don't know if they use this conected to a battery or to the main AC.
I have also heard about using multiple photo flash circuits.
If i use higher voltage have i to do more layers whith the coil?
A: The relays have numbers that refer to switches in the schematic (K1, K2). K1 is used to trigger the thyristor (so you don’t have 400v on your trigger switch), the same relay interrupts the charging circuit. This prevents the SCR from staying conductive after each shot.
K2 prevents the capacitors from charging from the batteries, it is now only able to charge when the gun is 'on'.
The tension of our ac connection is 220V here, and with a variac I can transform it to 270V. the waveform is no problem, but the charge will slow down when it reaches max voltage, the peak tension is 270* root2 = almost 400V.
It took 90 seconds to charge them to 300V at aa batteries, but it was a very poweful photoflash charger. It consumed 8A from the batteries which tend to get very hot by this. Multiple flash chargers will work without problem I think, but im not sure if they will work on 18V?
Not many photoflash chargers reach 400V, most stop at 300-350V.
I have no experience with microwave circuit charging so I wouldn’t know how that works. The nuber of turns is important, and depends of the capacitor bank voltage. Higer voltage generally means more turns.
And your english is not bad at all, compared to mine that is;)
Q: So i looked a litle for capacitor charger and i finded this http://www.linear.com/pc/productDetail.jsp?navId=H0,C1,C1098,P14753
just what a needed (i hope) will see with my electronics teacher :).
I think i can find 9V relays and i don't think i am going to use any LEDs (even if this make a good decoration )
So my shematic will look like this(joined file)?
You use a bulb as charging resistor but i think i will take somethig less .... i won't say ugly but that breaks the style you could have with your gun :s .So bye for the moment i am still working on theory i think i am goig to build this during next hollidays.
A: That schematic will work fine, you can also lose relay K2. It’s not really necessary.
A bulb is the most easy charging resistor, and it has some nice characteristics (resistance drops when the capacitor bank gets full). But you can also use a normal resistor. When using the charge circuit with that capacitor charger, you don’t need any charge resistor at all.
Q: First what is the use of D5 and R1 (just before the voltmeter) is it to protect the voltmeter or...?
And what type of High voltage diode have you used (if you have still the references)
A: D5 and R1 are to protect the capacitor bank from charging negatively, due to induction of the coil. R1 should be around 5W, the diode should be able to handle high currents.
Q: can i have a list with the references of each component? (I am going to buy them before next week)
Also is the barrel also made from plexiglass?
What do you use to transform your ac voltage (220-->270)?
PS When i will have finished this part i think i will make a 2nd and a third stage with the same components
A: Yeah I’ve had some problems with my site. All the referral links don’t work anymore L I’ve managed to lead everyone who gets the error straight back to the homepage. All referral links which start with megavolts.nl/index.php/en/ now start with megavolts.nl/en/. The link is cleaner but the old one should still work… I think it’s caused by my recent joomla update.
What do you mean by references of the components? All the important specs are in the schematic. (except the coil, that should be 2mm wire).
the relays should be able to handle 3A
R3 = 1W R1,r2 = 5W D5,D6 = above 400V, +-10A
The barrel is made from PVC installation tube 16mm, but any plastic or acrylic would be fine. The closer the coil is to the projectile, the better (thin tube).
I used a variac to transform the voltage up a little, but if you use the capacitor charger circuit you send erlyer you don’t need a transformer (or ac connection).
Let me know when you get it working, and the multi-stage version J nice that you want to qote me, remember to use the new link;)
Q: It's just a question about the : relays what is their part number? I am strugling with finding these relays :s (at least who is the manufacturer).
A: I don’t have a part number of manufacturer, but that doesn’t matter. It depends on the circuit voltage, in my case 5V. buy any relay that works on 5 or 6V that has 2 separate contacts. Take a high amperage rating +- 10A.
Q: Will this relay do it?
A: that relay will do fine, it all depends on your charge current.
I am now working on an improvement of my gun, I m going to replace the power relays with 17A versions and use 4x 1000W halogen tubes as charging resistor. Hopefully this will reduce charge time to 2sec or lower J.
Q: I put my schematics for the 2 stage coilgun but for the components i just want to check (it's the same systeme as yours)
the 4 D1 D2 R1 R2 Thyristor relays (they are CO single contact (one position for the charge one discharge(it's cheaper :D))
A: Im not sure about the thyristor, I don’t know if 400A is enough. But the thyristor I used is pure overkill;)
The other components will work fine, with that relay and rectifier you can charge the capacitor bank very fast.
Q: maybe this thyristor will be enough :)
What type of bobin did you use (1 or 2 mm?) were did you find it?
I am going to use a basic resistor for the charging systeme (about 50 to 150 ohm) what wattage should i use?
A: I think that thyristor will do great, and it’s pretty small too. The bobin is about 100T 2mm wire.
Calculate the resistor wattage using ohms law, p=u*I = u^2/r. with 50 ohms the resistor should be around 1058W (230v), but the time it actually dissipates that amount of energy is very short. So a 250w or maybe 100w will work too.
Charge time for 8000uf would be 5*50*(8000*10^-6)= 2 seconds
Peak current would be I=umax/r = 6.5Amps
If I could sell 1 or 2 a month of these, that would be perfect. Im still at school, so at least I can make some money this way. I’m afraid it will be more that 300usd, more likely double that amount. (4 new capacitors of 2200uf 400v are already over 200 dollar).
Q: Here are my capacitors :D only 1 for 8000uF
A: That is one big capacitor:D
Q: Just a question : where did you find your coil? because i dont find one with 2mm :s
A: I found my coil laying around, no manufacturer or anything.
2.00 isn’t specifically required, but I recommend 1.8-2.2mm. if you can find/order some coil wire you can wind it yourself, to your own specifications.
Q: Finally i am goign to use this thyristor, pretty much more efficient and easy to handle (the other was i think to little)
And look this , it seem'sto bemore popular than i thik but the most important is advert :D
A: That wire will do the job, a little bigger would be best for large projectiles.
The thyristor is better, it has a higher peak current rating, but it’s also more expensiveL.
Q: What did you use to make the conexions between the elements? Because i don't think we can use soldering
A: I stripped the wire from insulation, and bent it into a loop. I flattened the wire with a hammer/file to increase contact surface, and used a screw-washer-nut combination to force the wires together. Make sure the copper is in good contact with each other, after that you can pour solder in if you want. But you are right when you think solder alone isn’t enough, I actually had one solder connections explode with one of my tests.
-----------------------------------------------------------------------------
Q: I'm an amateur experimenter though i mostly deal with non-electrical devices along the lines of rocket engines etc. but I've always been interested in building a coilgun. I just had a few questions, how exactly do you shut off the current when then projectile reaches the center of the coil, are there contacts so the projectile completes a circuit or am i missing something? Also, I was wondering about the feasibility of building a multi-stage coil gun in more of a rifle configuration, if the power supply needed would make it unwieldy or if it would just be a matter of a longer charge time or switching the current to the next coil? im gathering information right now and thinking about trying to build a larger rifle configuration with a higher muzzle velocity, comparable to that of a small rifle.
A: With my coilgun, the current doesn't get switched off. I tried different capacitors and coils to get a 'good' working configuration. For this configuration, the coil and capacitor bank have to be tuned together. This is less efficient than switching the current off at the right time, but it is my first coilgun so that doesn’t bother me very much;)
A multi stage gun is possible, but you need more capacitors (heavy), and you need to time each coil with an optic sensor.
One option is to use smaller projectiles, you need multiple stages to get the energy of the capacitor bank in the projectile, because there is less material to magnetize. But muzzle velocity would be higher, and kinetic energy roughly the same.
The capacitors are the limiting factor, you want as many joules stored as possible with a very low internal resistance (equals high voltage capacitors, 300V+). Charging them isn’t really a big problem, but they take a lot of space.
-----------------------------------------------------------------------------
Q: Ik ben nu voor mijn PWS een coilgun aan het maken en ik heb 6 33000uF 40V condensatoren. Nu heb ik een schema gemaakt (zie bijlage) en ik weet dat ie te simpel is, maar zou jij mij kunnen uitleggen wat er nog meer in moet? En kan ik gewoon ieder lamp gebruiken als weerstand voor de condensatoren? En zorgen lampen er dus ook voor dat de condensatoren vanzelf 'leeglopen' als de stroom eraf is? De spanningsbron is trouwens al gelijkstroom.
A: Leuk project voor een pws, je hebt in ieder geval voldoende condensatoren. Je kan elke gloeilamp gebruiken als laadweerstand (40v of hoger), deze zet je in serie met je voeding. Je hoeft er dus maar een voor alle condensatoren te hebben. Je kan ook een lamp gebruiken om ze te ontladen, maar dan moed je hem parallel over de condensatoren zetten.
Je kan in plaats van een lamp ook een gewone dikke weerstand gebruiken, of helemaal achterwegen laten. De meeste labvoedingen kunnen wel tegen sluiting (je spanning is toch niet zo hoog).
De diode die je in het schema getekend hebt moet je omdraaien en parallel over de spoel zetten, dus met het pijltje naar boven. Dit is om de inducties (negatieve spanning) af te vangen van de condensators. Hij moet dus niet in het hoofdstroom circuit zitten.
Ik denk dat je als schakelaar het beste een thyristor kan nemen, omdat mechanische schakelaars het meestal niet zo tof vinden als ze ineens 500A moeten verwerken.
Q: Ik heb even het schema aangepast volgens jou aanwijzingen (hoop dat ik het goed heb gedaan :P).
Dus als het goed is zou ie nu moeten werken (als ik jou aanpassingen goed heb verwerkt)? En nog 1 klein vraagje: als de condensatoren zijn opgeladen is dan de gloeilamp uit, want dan is de Volt 0 toch?
A: Zoals de gloeilamp nu staat in je schema ontlaad hij de condensators, maar ik denk dat als je wilt testen het niet zo handig is als ze telkens leeglopen als je de voeding uitzet?
Ik heb je schema een beetje aangepast, ik denk dat je het best de lamp als laadweerstand gebruikt (serie). De thyristor schakelt het best aan de ground kant van het circuit.
Q: Wat voor doel heeft een gloeilamp op die plek (Ik weet nog niet zo heel veel ervan :P)? Want mijn doel van die gloeilamp was, dat wanneer je de stroom eraf haalt, dat dan de condensatoren gelijdelijk ontladen zodat het minder gevaarlijk is voor niet-oplettende mensen. Dus tijdens het testen halen we maar heel kort de stroom eraf, en ontladen het geheel bijna direct erna. Ik weet niet hoe snel die dingen ontladen met een gloeilamp maarja.
A: Dat kan ook, in principe maakt het niet zoveel uit. Ik had hem op die plaats gezet voor het geleidelijk opladen van de condensators.
Q: Ik heb gister maar ns mn coilgun in elkaar gezet volgens het volgende schema 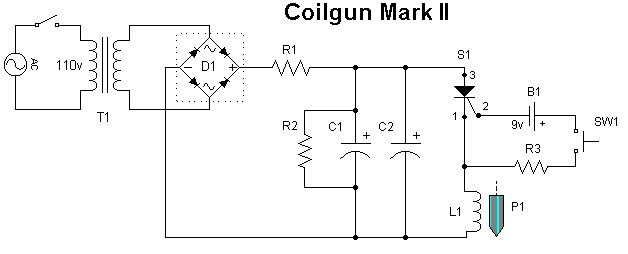
Parts List
B1 - 9v transistor battery
C1,C2 - 12,000 microfarad electrolytic capacitor, 200 wvdc (working volts d.c.)
D1 - 800v bridge rectifier
L1 - launching coil
P1 - iron projectile
R1 - 470 ohm 1/2 watt, charging resistor
R2 - 11K ohm 1/4 watt, safety bleeder resistor
R3 - 4.7K ohm 1/4 watt, trigger resistor
S1 - 600v 20A SCR, "silicon power cube"
SW1 - momentary action pushbutton switch
T1 - transformer, 110v primary, 18v secondary
Hij deed het 2x gewoon goed, maar de 3e keer kregen we kortsluiting en was de zekering in de voeding kapot:P. Dus nieuwe voeding gepakt, en aangezet... de condensator laadt niet op... weerstand R1 weggehaald en dan laadt ie ineens wel op (maar niet echt geleidelijk). Dus daarna steeds een lagere weerstand neergezet en het was iedere keer zo dat de voeding bijvoorbeeld 20V gaf maar dat de condensator maar 0,1V was. Ik heb ook al een lampje als weerstand gebruikt, werkt ook niet.
En het rare is, gisteren laadde ie wel op met gewoon die weerstand van 470 Ohm.
We hadden trouwens maar 1 condensator gebruikt (40V 33000uF)
Wat doen we verkeerd? Weet jij misschien iets?
A: Eehm tjah… heb je telkens voor het schieten de voeding uitgezet? Anders blijft de thyristor misschien openstaan. (wanneer je een thyristor activeert blijft hij ‘aan’ tot de spanning over het geheel 0v is)
Misschien is je thyristor stuk? Haal hem los en meet de weerstand, 0 ohm? = stuk.
Wat ik erg vreemd vind is dat je voeding stuk is gegaan, zelfs als er ergens sluiting is in het circuit zou je hele voedingsspanning over de 470 ohm weerstand komen, en zou er max 42mA mogen lopen bij 20v.
Probeer eens de condensator op te laden zonder de thyristor en coil, als het dan wel goed gaat weet je dat het probleem daar niet zit. Controleer je bedrading, zoveel kan er niet fout gaan bij dit schemaJ
Q: Tijdje geleden dat ik gemaild heb, maarja dat krijg je met vakantie :P. Maaruh, we hebben de coilgun werkend gekregen. gewoon de condensatoren parallel en een standaard switch geen SCR meer. Maar als we nu 4 condensatoren opladen tot 40V dan komt het projectiel er nog steeds maar met 12km/h uit. we hebben nu 2 spoelen achter elkaar gezet zodat we in feite een wat langere spoel hebben. dus we hebben in totaal dan 400 windingen. en een spoel van ongv 10cm en een projectiel van ongeveer 6cm met een diameter van 1 cm.
Dus ik dacht ik mail even om te vragen of jij nog iets weet waardoor ie wat harder kan schieten misschien. oh ja en de ontladingstijd van 1 condensator is 0,07s en van 2 is het 0,14 en 3 0,21 enz. Dus met 6 condensatoren heb je een ontladingstijd van 0,42s. is dat niet een beetje traag?
A: Mooi dat het al werkt, nu is het een kwestie van verbeteren en experimenteren. 400 windingen lijkt me wel erg veel, ik heb er maar 100 en daar zet ik 400v op. Ik weet niet of het goed omlaagschaalt maar probeer eens 10 of 20 windingen met heel dik draad? En als spoellengte zou ik de lengte van het projectiel aanhouden of iets langer.
De ontladingstijd zou niet veel langer moeten worden als je meerdere condensators parallel zet. De stroom gaat echter wel omhoog. Als je een kleinere spoel hebt (minder windingen) dan is de ontlaadtijd ook veel korter.Q:
Q: Ja het zijn 2 spoelen van 200 windingen per spoel. maar ik weet niet echt een plek waar ik dik draad kan krijgen zo even snel (het moet over 2 weken af zijn :P). en qua spoellengte zitten we dus even vast aan de lengte van de spoelen van school.
En onze condensatoren gaan maar tot 40V. maar de ontladingstijd wordt dus per condensator die we toevoegen wel meer (0,07s). Misschien moet ik even kijken of de draden wel echt goed aangesloten zijn :D.
A: Je zou als laatst nog kunnen proberen de 2 spoelen parallel te zetten in plaats van serie, kijken of hij dan wel sneller gaat.
Q: Ik dacht ik stuur nog effe een mailtje. de maximumsnelheid die we hebben weten te halen was ongeveer 23 km/h met 1 condensator op 40V (raar genoeg werkte het met meer condensatoren minder goed maarja). ooit maak ik nog wel een betere versie, waarbij alle condensatoren gewoon goed werken :P.
Maarja uiteindelijk hebben we een 8,5 gekregen voor ons PWS dat wordt afgerond naar een 9 dus dat is heel mooi.
A: Graag gedaan! Gaaf dat je een 9 voor je pws gekregen hebt, goed werk verricht dus!
Heb je de effici?ntie nog uitgerekend? Met snelheid van je projectiel, gewicht, energie uit je condensator? Ik heb overigens hetzelfde verschijnsel gezien bij mij, meer condensatoren is niet altijd beter. Dit heeft waarschijnlijk te maken met een ideale spoel-condensatorverhouding (en de bijbehorende ontlaadtijd).
Q: Ja de maximale efficientie was iets meer dan 2%, maarja das nog wel redelijk :P maar het kan natuurlijk (veel) beter.
-----------------------------------------------------------------------------
Q: We zijn erg geïnteresseerd naar jouw ontwerp van je coilgun. Zou je ons misschien wat details kunnen geven? Zoals bijvoorbeeld de technische tekening die je hebt gebruikt. We zijn beiden behoorlijke techneuten dus we kunnen de meeste technische praat tot een bepaald niveau volgen.
A: Leuk dat je je PWS wil maken over coilguns. Voor mijn coilgun heb ik geen specifieke bouwtekening, ik hobby meestal maar wat aan en maak het zoals het in mijn hoofd zit. Het elektrische schema heb ik wel uitgewerkt en deze hebben jullie waarschijnlijk al gezien. Ik heb een hoop overbodige dingen verwerkt in mijn versie, als je alleen het hoofddeel maakt (spoel, condensatoren, thyristor) dan ben je veel sneller klaar.
Houd er rekening mee dat de energie in condensatoren berekend kan worden met: 0.5* capaciteit(F) * spanning(V) kwadraat. Een hogere spanning is dus van grotere invloed dan een hogere capaciteit, ook hebben hoge spanning condensatoren (>300v) een relatief veel lagere interne weerstand en zijn daardoor beter geschikt voor coilguns.
-----------------------------------------------------------------------------
Q: Ik wil voor mijn profielwerkstuk graag een coilgun bouwen, maar mijn grootste probleem is om aan condensatoren te komen... Het enige wat ik zelf heb is een 13000 uF elco waarvan ik geen idee heb hoeveel volt (20 gaat in ieder geval), een van 2200 uF van 25 V en nog 2 van 1000 uF van ook 25 V. Dat alles bij elkaar is nog geen 11 J... en dan heb je nog niks weggeschoten ook.
Dus mijn vraag is, waar heb jij je elcos vandaan geplukt?
A: Ik heb mijn condensatoren van school gekregen (HBO elektrotechniek). Ik weet niet of ze bij jou een elektro afdeling hebben anders zou ik daar eens gaan kijken. Probeer in ieder geval hoge spanning elko's te vinden, rond de 300v +-100v.
-----------------------------------------------------------------------------
Q: Ik heb een 500w lamp betekend dit automatisch dat hij ongeveer 3 keer zo snel laad?
Op je website vertel je dat je ongeveer 100euro in dit project hebt gestoken. Nu ben ik op zoek gegaan naar condensatoren en daar alleen al ben ik tegen de 200euro aan kwijt. Heeft u een adres waar ik ze goed koper zou kunnen krijgen? En zo niet ik ben tegen een 8800uf 400v aangelopen die redelijk te betalen was laad deze langzamer? Laatste vraag hoe dik is de loop die jet gebruikt hebt en waart vind ik die?
A: Leuk dat je ook een coilgun gaat maken, is het voor een project van school of voor hobbydoeleinden? Een goed idee om een 500w lamp te gebruiken, van die halogeenbuisjes zeker? Dat laad idd veeel sneller. Je zou ook kunnen overwegen er 2 of 3 parallel te zetten. Misschien dat ik die aanpassing wel op mijn geweer maak.
De 100 euro die ik in dit project gestoken heb zijn voornamelijk schroefjes en plexiglas plaatmateriaal, de condensatoren en thyristor kwamen bij school vandaan (bij de opruiming). Als het een schoolproject is kan je vragen of je nieuwe mag bestellen, die zijn wel veel beter (deze zijn 20 jaar oud). Je zou ze op 2ehands sites kunnen vinden of elektronica dumpwinkels.
Mijn loop is 16mm slagvast pvc installatiebuis J
Q: Het project is helaas niet voor school. Dat had qua kosten en tijd natuurlijk net iets gunstiger geweest.
Eigenlijk dacht ik gewoon aan een gloeilamp 500W 230V E40. Maar die halogeen buisjes zijn denk ik beter. Ze nemen in ieder geval minder ruimte in beslag. Ik heb nog wel een paar flits lampjes van weg werp camera’s liggen. Daar ga ik het is mee proberen. Hoe kan ik die lampjes het besten meten? Gewoon ouderwets een batterij er op en met de multimeter aan de slag?
Ik heb een beetje gezocht op ebay en kwam dit tegen.
http://cgi.ebay.com/1000uF-450V-Radial-Electrolytic-Capacitors-10-PCS-105_W0QQitemZ160394059952QQcmdZViewItemQQptZLH_DefaultDomain_0?hash=item25583b20b0
Op zich een goede deal leek (+-30 euro) mij alleen wordt mijn gun dan een beetje groot maar dat kan er ook wel leuk uit zien. Doen?
Wat voor sites bedoel je met elektronica dumpwinkels? Of bestaan die niet online?
A: Ik bedoelde eigenlijk van die halogeen bouwlamp buizen, ze zijn een stuk langer maar nemen idd minder ruimte in dan een gloeilamp. Die caps van ebay zijn een stuk kleiner dan die blauwe van mij 50x 110 mm, en je hebt dan een hogere capaciteit en spanning. Ik zou zeggen doen! Meer condensators parallel is ook beter ivm interne weerstand. Met 10.000uf op 450V zit je op 1012,5Joule, daar moet je toch wel iets leuks mee kunnenJ
Online winkels zijn baco-army-goods.nl en dickbest.nl er is ook een winkel die heet quackelstein oid, die schijnt heel veel te hebben.
Ik rekende net uit dat met 2 halogeenbuizen van 500W parallel mijn laadtijd van 14 sec naar 2,1 sec gaat (aan de hand van de rc tijd) nu is dit relatief omdat je laad met ac gelijkgericht maar tochJ. Ik rekende dit overigens uit met de warme weerstand van de halogeen buizen, maar in werkelijkheid worden ze denk ik niet eens warm dus gaat het nog sneller. Alleen is het relais wat ik gebruikt heb maar geschikt voor een laadstroom van 3A, dus ik kan het niet makkelijk aanpassen.
Als je met testschieten begint kan je mijn snelheidsmeter wel lenen, dat is een stuk beter finetunen dan met 5 lagen karton en kijke hoe diep hij komt;) je kan het best eerst een ‘open’ opselling maken, om te zien welke spoel / capaciteit / projectiel en afstand tot de spoel het meest ideaal is. Daarna kan je makkelijker een behuizing ontwerpen wat op een geweer lijkt.
-----------------------------------------------------------------------------
Q: Even een misschien iets wat domme vraag, gebruik jij nou 100V 2200uF condensators? Ik heb er ook een paar op conrad gezien, maar als ze 100V en 2200uF zijn zijn ze dan het zelfde?
A: Ik gebruik 400V 2200 uF condensators, dat is heel wat anders dan de 100v versie. De energetische inhoud (joule) is afhankelijk van de capaciteit en van de spanning in het kwadraat, de spanning is dus belangrijker dan de capaciteit. E= 0,5 * C * U^2 Zo heeft de 400v versie 176 Joule aan energie in zich, de 100v versie maar 11 Joule.
Q: Waar heb jij de jouwe dan vandaan?
A: Ik heb de mijne uit een opruiming op school. Misschien een idee om naar 2ehands spullen te zoeken? Als het goed is moeten ze zulke grote condensatoren ook hebben bij elektronicazaken.
|
|
Due to the many questions I get regarding coil gun designs, I decided to start this guide for starters. This guide is mostly about single stage coil guns and will be under constant change. Questions and answers will be placed here and comments/suggestions are welcome. |
First I must point out that I'm not an expert at this area, I just understand enough of the Principle's to get it working.
I will start this article by placing random questions and answers, later I will rewrite it into something more readable. Different conversations are separated by a row of ---'s, formalities like thanks for your help and you're welcome are left out for a better overview.
-----------------------------------------------------------------------------
Q: Well i am building my first one, but i cant find anyvare how to make a coil for coilgun.
I need to know induction, it no need to be exact, but if u tell me some number i'll be very happy.
here are my specs:
-One coil
-Cap: 20 000uF
-Voltage: 315VDC
-Thyristor switching 1600V/160A
-Projectile: 30x7mm
-Weight: about 2g
A:
you have enough capacitors, that can handle almost 1000 Joule. but your projectile has a very small diameter (compared to mine). therefor you need multiple stages to transfer the energy effeciently. a single coil simply wont do it, not enough material to magnetize.
the coils themselves dont have to be calculated very precise, the coil parameters doesnt seem to have much influence. but i can give you ea few guidelines:
use a thick wire (1.5-2 mm), to reduce ohmic losses
the coil length should be around the same length as the projectile
for 300-400 volt use around 100 windings.
you can also just make a coil and change the amount of capacitors to 'tune' it, thats what i did with my gun. i have about 10 more of these capacitors laying around, but using more would actually reduce muzzle speed.
Q:
guess i will need an antiparalell diode on my caps, cause i have blown my 25A bridge :D , i used too big coil. So now i will make bigger projectile, and new coil. i've got two 10 000uF caps, so i will tune by adding and decreseng coil turns. Thanks for the numbers again.
A:
yeah tuning with 2 capacitos is difficult;)
tuning with the coil is also possible, you can wind a coil of 6 seperate layers and put them in series to see how many layers work best.
-----------------------------------------------------------------------------
Q: Does stranded wire matter for the coil gun does it have to be solid wire? also if i have a 300 watt disposable camera capacitor should i use 22 gauge only? or whast would be the proper specification.
A: there is no significant difference between stranded or solid, both shoud work fine but solid looks better and winds more easily. 22 gauge is a bit thin, but it will probably work. I think 18-16 gauge would be best, depends on your project size.
Q: i also wanted to now where can i get higher capacity capacitors..? because i was thinking of using 18gauge wire mixed with 12 gauge wires any tips on what kind ofcapacitor i should get?
A: I think the capacitor size depends of the coil and projectile size. for example a higher capacity on my gun would actually reduce muzzle speed, so you really have to experiment a little.
I would say use capacitors with 300-400V and start with around 500uF, increase or decrease the capacity and see what works best. Use a thyristor to discharge the caps.
-----------------------------------------------------------------------------
Q: 1) The capacitors you are using are quite large. I bought much smaller ones with the larger capacitance value, totaling 9400 uf (in parallel of course). However, the voltage rating is only 70 V (DC) Is it possible to add another capacitor, with a capacitance of 0.0047 uF with a voltage rating of 500 V to raise the total voltage to 570 V and the total capacitance to 9400.0047 uF? I am just trying to increase the total voltage it can handle, not increase the capacitance with the third capacitor. I also realize, that the charge time will be longer since i am using a larger capacitors than you are.
2) My knowledge of electricity, is small, and only from a physics course in school. I know there is a formula to calculate magnetic force from a solenoid, but how can I calculate the ampere produced when the capacitors release their "energy"? And how do i calculate for the multiple layers of wires like yours has? (I realize there is information on your website, but I do not understand it. *language barrier*)
3) Without using the light bulb, but using the voltage meter, how do you know when the capacitors are fully charged?
4) Did you use an AC to DC converter? If so, how much is the voltage after it is converted?
A: The charge time depends on the value of the charging resistor, if I had the right one charging would take max 2 seconds.
1 What youre trying to achieve is not possible, the tension would indeed increase if you put them in series, but the total capacity would be smaller as the lowest capacitor value in the setup. Its like putting 2 resistors in parallel, the replacement resistor is lower than the lowest value of the resistors.
My capacitors are indeed quite big (and at least 10 years old), and there are much smaller versions available now. The energy inside a capacitor is determined by its capacity and the tension, however this is not linear. If you increase the tension, the energy (Joules) goes up in a 2 squire.
Example, my capacitors have 8800uf and 400v,
The energy inside is 0.5*Capacity(F)*tension(V)^2
=0,5*(8800*10^-6)*(400^2)= 704J
Jour capacitor bank is:
=0,5*(9400*10^-6)*(70^2)= 23J
You see the tension is a very important factor, the energy in your capacitor bank is about 30 times lower than the one Im using, even though your capacity value is higher.
2 I know there is a formula for it, but I have never used it. When I build this it was more like trial and error: ). The coil I used is a standard coil I found somewhere, I just put a plastic tube in it and started experimenting with different capacitor values and tensions. It fired actually slower when I use more than 4 of these capacitors (I have 12).
3 the voltmeter indicates the tension on the capacitor, when this reaches the max value the capacitors are made for they are full.
4 I did use an ac-dc converter, the tension you get out of ac is root2 *ac tension.
Im using 230v, 230* 1.414 = 325.3 V to reach 400v I use a variable transformer witch increases the ac voltage to about 280V.
Q: What if I put my capacitors in parallel. Than, the capacitance would add up, but would the voltage also add up?
And lastly, where did you get your rounds (the metal slugs that you shoot)? And what is the diameter of your barrel?
A: if you put capacitors in parallel, then the tension keeps the same as a single capacitor. if you put them in series the tension increases but the capacity decreases rapidly. the energy that fits in each capacitor stays the same.
i creates my rounds from a steel rod, and used a turntable to get the right diameter and to make nice round tips. my barrel is 16mm outside and 13mm inside (standard pvc electrical tubing), the round itself 12mm.
most people tell me that you need smaller/lighter objects, so you can get higher speeds. i think youd better use something in the range of 5-9mm rounds. you can use standard bolts or nails as projectiles. cut them to the right length.
it's important that the coil is as close as possible to the projectile, so use a thin barrel.
-----------------------------------------------------------------------------
Q: hey,I was wondering if you can help me out.I am just going to start making a coil gun.This is my first project and till know i have quite a good understanding of how they work.I would like to ask you a couple of things.First i would like to ask you how you made the reloading system.Something else i cant quite understand is to make a trigger system,from what I have read a simple button wont work.Finaly I just want your oppinion on what I should use as a barrel and how I should make it.
A: i assume that you looked at the schematic at: http://hackedgadgets.com/2009/05/07/mv-coilmaster-mark1-coil-gun/
the reloading system is quite simple, gravity pulls the bullets down. there is a hole where only one bullet fits trough. the coil is placed in front of the hole and pulls the bullet out of the clip and launches it at the same time.
for the trigger you need a power fet or a thyristor (last one is the easyest). when you look at the schematic you see the thyristor is activated by a relais contact, but this activation switch can be very small since the currents dont go over 0.3A (a very short pulse). so any switch for that will do.
the barrel shoul be a non magnetic material, preferably plastic, in any case not aluminum (wich is heavily repelled by strong magnetic fields) i used a standard electrical installation 16mm pvc tube, but you really need something smaller.
-----------------------------------------------------------------------------
Q: Do you have instructions for how to make the coil gun? I'm not an electrical whiz, but I understand how this thing works in a rudimentary way that I was wondering if I could build one with some modifications.
I think 5mm ball bearings would be a better choice of ammunition using a continuous pulse wave through the coil (charge up capacitors in sequence). Think of it a machine gun with BB ammo, the effect of sending 100 projectiles with the same energy requirements as the one slug that weighed more. The velocity would be vastly improved as well. I'd be glad to pursue experimentation down this road with your assistance (or simply detailed photos of the guts/components with labels for parts and what they do).
A: I don’t have any build instructions, I just make it up when I go..
I just wanted big projectiles;) velocity would greatly increase when you have lighter projectiles. Bb like bullets are great for aerodynamic, but less efficient to fire I think. Timing becomes more critical unless the projectiles are longer (also more material to magnetize).
My gun is actually quite simple, no real complicated electronics. I send you 2 schematics, one is of my coilgun and the other is just the basic firing part. You only need that and some form of charging system
-----------------------------------------------------------------------------
Q: I've been contemplating making a coil gun for a long time. Recently, I finally got around to purchasing almost all the parts I needed and didn't have, which was just capacitors and magnet wire. I came across your coil gun project, and schematic, a few weeks ago and thought it was a very good design. However, the schematics that you have online (here) are too vague to build. Do you think you could clarify and label the parts in more detail so I could build it? For instance, what type of switches are S1-S4 , what are the ratings for the diodes you used, and what are K1 and K2?
While I know I have access to all these parts (I have a lot of spare parts), excluding the IC which I can get online, I wouldn't know which ones to use. Could you please help me with your schematics? Also, did you really just use one photo flash charger for all the capacitors? You must have used something else because 6volts burns out all of the chargers I have.
A:
Switches 1-3 are standard power switches, the 3 switches you see at the side of the gun. S4 is a micro switch located behind the trigger. The diodes I used can be any high speed type, I used the mur 860 from one of my teslacoils. They are just there to prevent that the capacitors charge negatively from the induction of the coil.
K1 and k2 are Relays with double contacts. The voltage regulator is used because I only had 5v relays, if you use 9v relays you won’t need the voltage regulator ic.
The photo flash charger I used is made for 6v and is from a large external flash unit, it pulls over 8 amps from the batteries.
-----------------------------------------------------------------------------
Q: I have seen these massive audio capacitors (some around 5 farads, but many in the 1.2-1.5 range) and was wondering how one could modify this circuit to handle that kind of capacitor. Most that I have seen are rated at 20/24 volts... one could attach them in series for a doubling of voltage for a corresponding decrease in capacitance... that would still be .75 farads (assuming 1.5 farads each)... which is 85 times larger than the capacitance you used in this circuit...If I attached more of them in series I could get an even bigger voltage and a correspondingly steeper discharge curve that would give me much much much more current... I might even be able to make a significantly larger coil... I would be able to eliminate the volt meter as these capacitors have volt meters built into them... my only concern really is what mods (if any) would I need to make to R2, D6, and T1... I see that you have it relay isolated so there isn't really too much that I could end up frying other than the components I already listed... and I definitely would not be using a photo flash charger to charge this thing... actually I'd prolly end up making it bolt action with replaceable capacitor banks and charge them with mains or I'd build some kind of portable charger that could charge them in less than a day... With capacitors this large I will need to be VERY careful so as to not introducing myself into a circuit with one of them... If you have any suggestions I'd be very happy to hear them... and I wont be disappointed if you say that it is inadvisable to use a capacitor that large.
I completely forgot about voltage considerations... If I use capacitors of the voltage I previously mentioned I prolly wont get that great of a device... Woops... I feel kinda stupid now... yeah your caps charged to 300v so If I wanted 300v I would need 15 of those capacitors... definitely a time to use ebay... but it would be 11 times the capacitance... which hopefully yields faster projectiles... might need a heat sink on the coil to dissipate heat.... I was meaning to ask was your choice of projectile size optimized to the magnetic field of the coil? Did those projectiles reach their saturation point?
A:
The energy inside the capacitors can be calculated by: 0.5 * capacity * voltage^2
This tells me that the energy inside a combined capacitor of 750mF and 48v is about 864 Joule, which is only slightly higher than my capacitor bank (704J @ 400v) . Furthermore, capacitors with a high capacity usually have a high internal resistance (because of the capacitor plate film is rolled in a coil) so you’d rather be putting them in parallel than in series. This means higher current, less turns on your coil. So you need a very powerful thyristor. Higher tension (+-300V) capacitors would be more suitable I think.
A heat sink on the coil would probably influence the magnetic field, so I don’t know if this is a good idea. You might want to think about using a fan to create an airflow… this would be a great improvement as well (my coil is inside a closed compartment so it takes forever to cool down).
My projectiles are optimized to the coil (which is a standard one I had laying around). I do not think they are saturated, because other coilguns have higher velocities. My theory is that the saturation is more speed related than weight related. But in my case adding more capacitors didn’t do me much good, I ended up slowing the projectile down, and even fire it in the opposite direction… so it’s definitely a finetuning between the capacitors, coil and projectile.
-----------------------------------------------------------------------------
Q: Ik ben nu voor mijn PWS een coilgun aan het maken en ik heb 6 33000uF 40V condensatoren. Nu heb ik een schema gemaakt (zie bijlage) en ik weet dat ie te simpel is, maar zou jij mij kunnen uitleggen wat er nog meer in moet? En kan ik gewoon ieder lamp gebruiken als weerstand voor de condensatoren? En zorgen lampen er dus ook voor dat de condensatoren vanzelf 'leeglopen' als de stroom eraf is? De spanningsbron is trouwens al gelijkstroom.
Je zou me echt heel erg helpen hiermee.
A:
Leuk project voor een pws, je hebt in ieder geval voldoende condensatoren. Je kan elke gloeilamp gebruiken als laadweerstand (40v of hoger), deze zet je in serie met je voeding. Je hoeft er dus maar een voor alle condensatoren te hebben. Je kan ook een lamp gebruiken om ze te ontladen, maar dan moed je hem parallel over de condensatoren zetten.
Je kan in plaats van een lamp ook een gewone dikke weerstand gebruiken, of helemaal achterwegen laten. De meeste labvoedingen kunnen wel tegen sluiting (je spanning is toch niet zo hoog).
De diode die je in het schema getekend hebt moet je omdraaien en parallel over de spoel zetten, dus met het pijltje naar boven. Dit is om de inducties (negatieve spanning) af te vangen van de condensators. Hij moet dus niet in het hoofdstroom circuit zitten.
Ik denk dat je als schakelaar het beste een thyristor kan nemen, omdat mechanische schakelaars het meestal niet zo tof vinden als ze ineens 500A moeten verwerken.
Q: Ik heb even het schema aangepast volgens jou aanwijzingen (hoop dat ik het goed heb gedaan :P).
Dus als het goed is zou ie nu moeten werken (als ik jou aanpassingen goed heb verwerkt)? En nog 1 klein vraagje: als de condensatoren zijn opgeladen is dan de gloeilamp uit, want dan is de Volt 0 toch?
A:
Zoals de gloeilamp nu staat in je schema ontlaad hij de condensators, maar ik denk dat als je wilt testen het niet zo handig is als ze telkens leeglopen als je de voeding uitzet?
Ik heb je schema een beetje aangepast, ik denk dat je het best de lamp als laadweerstand gebruikt (serie). De thyristor schakelt het best aan de ground kant van het circuit.
Q: Wat voor doel heeft een gloeilamp op die plek (Ik weet nog niet zo heel veel ervan :P)? Want mijn doel van die gloeilamp was, dat wanneer je de stroom eraf haalt, dat dan de condensatoren gelijdelijk ontladen zodat het minder gevaarlijk is voor niet-oplettende mensen. Dus tijdens het testen halen we maar heel kort de stroom eraf, en ontladen het geheel bijna direct erna. Ik weet niet hoe snel die dingen ontladen met een gloeilamp maarja.
A:
Dat kan ook, in principe maakt het niet zoveel uit. Ik had hem op die plaats gezet voor het geleidelijk opladen van de condensators.
Q:
Ik heb gister maar ns mn coilgun in elkaar gezet volgens het volgende schema
Parts List
B1 - 9v transistor battery
C1,C2 - 12,000 microfarad electrolytic capacitor, 200 wvdc (working volts d.c.)
D1 - 800v bridge rectifier
L1 - launching coil
P1 - iron projectile
R1 - 470 ohm 1/2 watt, charging resistor
R2 - 11K ohm 1/4 watt, safety bleeder resistor
R3 - 4.7K ohm 1/4 watt, trigger resistor
S1 - 600v 20A SCR, "silicon power cube"
SW1 - momentary action pushbutton switch
T1 - transformer, 110v primary, 18v secondary
Hij deed het 2x gewoon goed, maar de 3e keer kregen we kortsluiting en was de zekering in de voeding kapot:P. Dus nieuwe voeding gepakt, en aangezet... de condensator laadt niet op... weerstand R1 weggehaald en dan laadt ie ineens wel op (maar niet echt geleidelijk). Dus daarna steeds een lagere weerstand neergezet en het was iedere keer zo dat de voeding bijvoorbeeld 20V gaf maar dat de condensator maar 0,1V was. Ik heb ook al een lampje als weerstand gebruikt, werkt ook niet.
En het rare is, gisteren laadde ie wel op met gewoon die weerstand van 470 Ohm.
We hadden trouwens maar 1 condensator gebruikt (40V 33000uF)
Wat doen we verkeerd? Weet jij misschien iets?
A:
Eehm tjah… heb je telkens voor het schieten de voeding uitgezet? Anders blijft de thyristor misschien openstaan. (wanneer je een thyristor activeert blijft hij ‘aan’ tot de spanning over het geheel 0v is)
Misschien is je thyristor stuk? Haal hem los en meet de weerstand, 0 ohm? = stuk.
Wat ik erg vreemd vind is dat je voeding stuk is gegaan, zelfs als er ergens sluiting is in het circuit zou je hele voedingsspanning over de 470 ohm weerstand komen, en zou er max 42mA mogen lopen bij 20v.
Probeer eens de condensator op te laden zonder de thyristor en coil, als het dan wel goed gaat weet je dat het probleem daar niet zit.
Controleer je bedrading, zoveel kan er niet fout gaan bij dit schemaJ
Q: Tijdje geleden dat ik gemaild heb, maarja dat krijg je met vakantie :P. Maaruh, we hebben de coilgun werkend gekregen. gewoon de condensatoren parallel en een standaard switch geen SCR meer. Maar als we nu 4 condensatoren opladen tot 40V dan komt het projectiel er nog steeds maar met 12km/h uit. we hebben nu 2 spoelen achter elkaar gezet zodat we in feite een wat langere spoel hebben. dus we hebben in totaal dan 400 windingen. en een spoel van ongv 10cm en een projectiel van ongeveer 6cm met een diameter van 1 cm.
Dus ik dacht ik mail even om te vragen of jij nog iets weet waardoor ie wat harder kan schieten misschien. oh ja en de ontladingstijd van 1 condensator is 0,07s en van 2 is het 0,14 en 3 0,21 enz. Dus met 6 condensatoren heb je een ontladingstijd van 0,42s. is dat niet een beetje traag?
A:
Mooi dat het al werkt, nu is het een kwestie van verbeteren en experimenteren.
400 windingen lijkt me wel erg veel, ik heb er maar 100 en daar zet ik 400v op. Ik weet niet of het goed omlaagschaalt maar probeer eens 10 of 20 windingen met heel dik draad? En als spoellengte zou ik de lengte van het projectiel aanhouden of iets langer.
De ontladingstijd zou niet veel langer moeten worden als je meerdere condensators parallel zet. De stroom gaat echter wel omhoog. Als je een kleinere spoel hebt (minder windingen) dan is de ontlaadtijd ook veel korter.Q:
Q: Ja het zijn 2 spoelen van 200 windingen per spoel. maar ik weet niet echt een plek waar ik dik draad kan krijgen zo even snel (het moet over 2 weken af zijn :P). en qua spoellengte zitten we dus even vast aan de lengte van de spoelen van school.
En onze condensatoren gaan maar tot 40V. maar de ontladingstijd wordt dus per condensator die we toevoegen wel meer (0,07s). Misschien moet ik even kijken of de draden wel echt goed aangesloten zijn :D.
Nouja we gaan wel nog even experimenteren, bedankt voor je hulp in ieder geval.
A: Je zou als laatst nog kunnen proberen de 2 spoelen parallel te zetten in plaats van serie, kijken of hij dan wel sneller gaat.
Q: Ik dacht ik stuur nog effe een mailtje. de maximumsnelheid die we hebben weten te halen was ongeveer 23 km/h met 1 condensator op 40V (raar genoeg werkte het met meer condensatoren minder goed maarja). ooit maak ik nog wel een betere versie, waarbij alle condensatoren gewoon goed werken :P.
Maarja uiteindelijk hebben we een 8,5 gekregen voor ons PWS dat wordt afgerond naar een 9 dus dat is heel mooi.
Nogmaals bedankt voor de hulp en advies!
A:
Graag gedaan! Gaaf dat je een 9 voor je pws gekregen hebt, goed werk verricht dus!
Heb je de effici?ntie nog uitgerekend? Met snelheid van je projectiel, gewicht, energie uit je condensator? Ik heb overigens hetzelfde verschijnsel gezien bij mij, meer condensatoren is niet altijd beter. Dit heeft waarschijnlijk te maken met een ideale spoel-condensatorverhouding (en de bijbehorende ontlaadtijd).
Maargoed, succ6 met je studie verder en tot horens!
Q: Ja de maximale efficientie was iets meer dan 2%, maarja das nog wel redelijk :P maar het kan natuurlijk (veel) beter.
-----------------------------------------------------------------------------
Q:
Wij doen ons Profielwerkstuk over de raillgun. Maar omdat ons dit te ingewikkeld leek en niet lang mee gaat besloten we een coilgun te bouwen. En we zijn erg geïnteresseerd naar jouw ontwerp van je coilgun. Zou je ons misschien wat details kunnen geven? Zoals bijvoorbeeld de technische tekening die je hebt gebruikt. We zijn beiden behoorlijke techneuten dus we kunnen de meeste technische praat tot een bepaald niveau volgen. Alvast heel erg bedankt!
A:
Leuk dat je je PWS wil maken over coilguns. Voor mijn coilgun heb ik geen specifieke bouwtekening, ik hobby meestal maar wat aan en maak het zoals het in mijn hoofd zit. Het elektrische schema heb ik wel uitgewerkt en deze hebben jullie waarschijnlijk al gezien. Ik heb een hoop overbodige dingen verwerkt in mijn versie, als je alleen het hoofddeel maakt (spoel, condensatoren, thyristor) dan ben je veel sneller klaar.
Houd er rekening mee dat de energie in condensatoren berekend kan worden met: 0.5* capaciteit(F) * spanning(V) kwadraat. Een hogere spanning is dus van grotere invloed dan een hogere capaciteit, ook hebben hoge spanning condensatoren (>300v) een relatief veel lagere interne weerstand en zijn daardoor beter geschikt voor coilguns.
-----------------------------------------------------------------------------
Q:
Ik wil voor mijn profielwerkstuk graag een coilgun bouwen, maar mijn grootste probleem is om aan condensatoren te komen... Het enige wat ik zelf heb is een 13000 uF elco waarvan ik geen idee heb hoeveel volt (20 gaat in ieder geval), een van 2200 uF van 25 V en nog 2 van 1000 uF van ook 25 V. Dat alles bij elkaar is nog geen 11 J... en dan heb je nog niks weggeschoten ook.
Dus mijn vraag is, waar heb jij je elcos vandaan geplukt?
A:
Ik heb mijn condensatoren van school gekregen (HBO elektrotechniek). Ik weet niet of ze bij jou een elektro afdeling hebben anders zou ik daar eens gaan kijken. Probeer in ieder geval hoge spanning elko's te vinden, rond de 300v +-100v.
-----------------------------------------------------------------------------
Q:
Hi, I'm a high school student and I am building a coil gun to test the speeds of various ferromagnetic metals for my school's science fair. Your coilgun was impressive! Would you mind reviewing my design for a seven stage coilgun in the attached JPG file and give me any suggestions on its design ( could you first tell me if my current design will work at all)? I would be very grateful if you responded within the next two or three days.
A:
I’m not quite sure i understand your schematic, in any case the charged capacitor has to be switched parallel to the coil to discharge. I don’t see how that’s done in your schematic. If youre planning to use a battery on a low voltage (12-24v) you might be better off using no capacitors at all, and use fets or power transistors to directly switch the battery over the coil. You only need to find a way to trigger each coil at the right time.
I recommend first using one coil, perfect it and then start adding stages, perfect everyone before adding the next.
I hope this information is useful to you, if you have any more questions jeust ask them:)
Q:
Sorry about that that picture was too general. Maybe these close ups will help clarify things
And just to be sure, does a transistor works the REVERSE way a fuse does? (When an electric current is introduced, it COMPLETES another circut)
A:
A fuse is used to switch off an over current(safety), a transistor is used to switch an electrical current (on/off) (not for safety).
In your schematic the firing position obviously works fine, I still don’t understand the charging position. But since there are no major currents trough the charging circuit that’s no problem. I assume you know that the polarity is very important with electrolytic capacitors.
How do you plan on timing the other stages?
Q:
I don't exactly know. My plan was that by the time the electricity made it to the transistor (bridging the circut for the next stage) the projectile will have made it to at least the halfwaypoint between the two stages, and the capacitor in the previous stage would have finished dumping its charge through the coils and stopped pulling on the projectile. The following stages are pretty much identical to the first stage with the exception that all of the stages after the first stage have a transistor in the place that the starting switch was in the first stage. The wire in the First Stage Schematic that extends to the right off the page leads to the second stage's "switch" (transistor) completing the second stage's circut so that the second stage's capacitor releases it's charge. I intend to have this layout in each of the six successive stages after the first one, until the projectile leaves the barrel.
A:
The electricity makes it instantly to the transistor, which would open all coils at practical the same time. I don’t think that will work, plus if it did the timing would be incredibly difficult to get just right.
I have seen other designs where de projectile itself pushes a switch or acting as a switch when entering each stage, you might want to try that. A more difficult design is placing optical sensors for each coil, you need electronics for this but the advantage of this is that the projectile doesn’t get slowed down by pushing switches.
Q: optical sensors, hmmm... are they particularly expensive? Could i buy six at one time for under 15 USD?
A: Probably, I think they are about 1-2 dollar each. You could make them yourself with IR led’s and IR receivers which is even cheaper (and probably better). Or you can use ones like I did in my speedometer project http://www.megavolts.nl/index.php/en/projects/geweren/116-mv-speedometer (but I had to replace the original leds because they weren’t bright enough).
Q:
So, if I were to incorporate Infrared sensors into my design, could I rig each one to each transistor, so that the projectile entering the IR sensor's light beam activates the transistor's circut closing capability for each successive stage of the cannon? (that is, if that's how IR sensors work, I'm not entirely sure)
Also, will the electromagnetic fields generated by the coils cause any interference with this additional electrical hardware?
A:
Yes that’s the general idea. But you probably need a little more electronics to make the infrared sensor fire the transistor. The electromagnetic field shouldn’t influence the sensors signal.
Q: Do you mind explaining to me what you mean by " a little more electronics"? I assumed that IR sensors are built so that when the beam is broken, an electrical circut is closed, making motion sensors ideal for activating alarm systems in high security facilities.
A:
That depends on what type sensors you are using. I referred to the simplest, fastest and cheapest kind. Here is an example http://www.circuitsonline.net/forum/view/60057
With that output you can switch the transistor (add a resistor to the base). But you should know that I haven’t build this so I won’t be able to give you much feedback.
Q: I can't read german, but I am taking your advice and I am going to be buying some cheap IR emitters I found online and use those for the switching process. Why do I need resistors? Don't I need as much current I can get to contribute to the magnetic flux to pull the projectile?
A:
There aren’t any resistors in your primary circuit, but you need resistors to protect the smaller components. Also if you don’t add a resistor to the base of your transistor it will fry out after a few shots. All currents are very low +-50mA, if you don’t use resistors the IR led burns out right away.
If you buy the IR leds and detectors separately, pay attention that they use the same wavelength (example 950nm).
Q:
Thanks so much for your help sir. I can actually see the cannon coming together. But i have a few more questions to ask. I've been looking for a while but I can't seem to find a simple enough schematic for an active Infrared motion detector. I want a circut where I have an IR emitter across from an IR reciever (across the diameter of the barrel, obviously) , and the IR emitter is continuously emitting a beam to the reciever, and when the projectile intercepts the beam, an electrical current is produced that travels to the stage's transistor. I also need an LED placed on the circut somewhere between the point where the electrical current is produced and the stage's transistor, so that I can know when the IR detector beam for that stage has been breached.
The schematics I have found online use devices that I'm unfamiliar with (such as an LM 555), or look too complex for me to repeat six times, and I'm really trying to stay away from using printed circut boards, but I will consider them if I have to.
A:
No problem, i found a schematic that will probably do the job: http://www.circuitsonline.net/schakelingen/16/modelbouw/eenvoudige-lichtsluis.html use google translate to translate the page.
When your source voltage is constant (12v) you can drop d1, d2, t1 and r1. (calculate r2 for the IR led you are using and r3 for the receiver). When the light is interrupted the led wil ligt up, you can use this signal for your power stage (use a npn transistor) 100ma max.
Q: I'm going to be utilizing 25V 22,000 microFarad electrolytic capacitors in each stage, so is the transistor you suggested (100mA NPN transistor) going to be able to handle 25V without a resistor? If not, can you suggest one that can, or at least specifications I need to look out for? I'm looking to get as much current into the coils as i can.
A:
The bc547 can handle up to 50V, you use the output of this transistor to power your end stage (like a thyristor or fet or power transistor). If you want to dump the entire capacitor charge on the coil then you might want to use a thyristor (which are easier and can carry more current). I just thought of a schematic that will probably be much easier to make and work just as well (see appendix).
A small switch will trigger the gate of a thyristor, the thyristor will stay ‘on’ until the entire capacitor is empty. There will be almost no current trough the switch itself, should you take a very small switch it will probably not affect the speed of the projectile. Repeat this for every coil stage.
-----------------------------------------------------------------------------
Q:
Hello, my friend and I are trying to replicate a coil gun similar to the one you have created. We are trying to figure out better techniques in making a coil gun more effective. I was wondering if you have heard of using a ring type projectile. Instead of loading a bullet inside of a barrel, a ring projectile would sit on the outside of the barrel. Though we have not figured out how to keep the ring steady in its trajectory. Do you believe this would be a better method? We'd appreciate any comments or ideas.
A:
I haven't thought of this when I built my gun, but I heard of this way recently.
The projectile must slide over the coil, this means either a small coil or a large projectile. A tube would still be useful for guidance of the projectile, you might think of letting the projectile slide over the outside of the tube? You can also try an aluminum ring partially slided over the coil, the magnetic field pushes aluminum away and attracts iron.
I haven't tried this but it certainly seems possible to me, you just have to experiment a little.
-----------------------------------------------------------------------------
Q: Even een misschien iets wat domme vraag, gebruik jij nou 100V 2200uF condensators? Ik heb er ook een paar op conrad gezien, maar als ze 100V en 2200uF zijn zijn ze dan het zelfde?
A: Ik gebruik 400V 2200 uF condensators, dat is heel wat anders dan de 100v versie.
>
> De energetische inhoud (joule) is afhankelijk van de capaciteit en van de spanning in het kwadraat, de spanning is dus belangrijker dan de capaciteit. E= 0,5 * C * U^2
>
> Zo heeft de 400v versie 176 Joule aan energie in zich, de 100v versie maar 11 Joule.
Q: Waar heb jij de jouwe dan vandaan?
A:
Ik heb de mijne uit een opruiming op school. Misschien een idee om naar 2ehands spullen te zoeken?
Als het goed is moeten ze zulke grote condensatoren ook hebben bij elektronicazaken.
-----------------------------------------------------------------------------
Q:
I have juste a few question about it (beacuase i am building one for a science project on the magnetic forces and their use).
I have only a few knowledge about electronics for the moment (capacitors, coils and basic stuff).
I was wondering what the upper right part of the schematic refered to (sorry my english must be verry hard to read XD).Is it for a SCR switch? What are the use of the relays?
You haven't any problems of charge while using the AC and the diodes (the curent must still varriate)?What is the tension of your AC current (I am living in france).
How long does it takes to charge the capacitors whit the AA battery? (I think that for my model i will use a 18Volt battery designed for garden working).
I have also heard that some people use microwaves circuit instead of the photo flash charger.But i don't know if they use this conected to a battery or to the main AC.
I have also heard about using multiple photo flash circuits.
If i use higher voltage have i to do more layers whith the coil?
A:
The relays have numbers that refer to switches in the schematic (K1, K2). K1 is used to trigger the thyristor (so you don’t have 400v on your trigger switch), the same relay interrupts the charging circuit. This prevents the SCR from staying conductive after each shot.
K2 prevents the capacitors from charging from the batteries, it is now only able to charge when the gun is 'on'.
The tension of our ac connection is 220V here, and with a variac I can transform it to 270V. the waveform is no problem, but the charge will slow down when it reaches max voltage, the peak tension is 270* root2 = almost 400V.
It took 90 seconds to charge them to 300V at aa batteries, but it was a very poweful photoflash charger. It consumed 8A from the batteries which tend to get very hot by this. Multiple flash chargers will work without problem I think, but im not sure if they will work on 18V?
Not many photoflash chargers reach 400V, most stop at 300-350V.
I have no experience with microwave circuit charging so I wouldn’t know how that works. The nuber of turns is important, and depends of the capacitor bank voltage. Higer voltage generally means more turns.
And your english is not bad at all, compared to mine that is;)
-----------------------------------------------------------------------------
Q:
So i looked a litle for capacitor charger and i finded this http://www.linear.com/pc/productDetail.jsp?navId=H0,C1,C1098,P14753
just what a needed (i hope) will see with my electronics teacher :).
I think i can find 9V relays and i don't think i am going to use any LEDs (even if this make a good decoration )
So my shematic will look like this(joined file)?
You use a bulb as charging resistor but i think i will take somethig less .... i won't say ugly but that breaks the style you could have with your gun :s .
So bye for the moment i am still working on theory i think i am goig to build this during next hollidays.
A:
That schematic will work fine, you can also lose relay K2. It’s not really necessary.
A bulb is the most easy charging resistor, and it has some nice characteristics (resistance drops when the capacitor bank gets full). But you can also use a normal resistor. When using the charge circuit with that capacitor charger, you don’t need any charge resistor at all.
Q: First what is the use of D5 and R1 (just before the voltmeter) is it to protect the voltmeter or...?
And what type of High voltage diode have you used (if you have still the references)
A:
D5 and R1 are to protect the capacitor bank from charging negatively, due to induction of the coil. R1 should be around 5W, the diode should be able to handle high currents.
Q:
can i have a list with the references of each component? (I am going to buy them before next week)
Also is the barrel also made from plexiglass?
What do you use to transform your ac voltage (220-->270)?
Thanks
PS When i will have finished this part i think i will make a 2nd and a third stage with the same components
A:
Yeah I’ve had some problems with my site. All the referral links don’t work anymore L I’ve managed to lead everyone who gets the error straight back to the homepage. All referral links which start with megavolts.nl/index.php/en/ now start with megavolts.nl/en/. The link is cleaner but the old one should still work… I think it’s caused by my recent joomla update.
What do you mean by references of the components? All the important specs are in the schematic. (except the coil, that should be 2mm wire).
the relays should be able to handle 3A
R3 = 1W
R1,r2 = 5W
D5,D6 = above 400V, +-10A
The barrel is made from PVC installation tube 16mm, but any plastic or acrylic would be fine. The closer the coil is to the projectile, the better (thin tube).
I used a variac to transform the voltage up a little, but if you use the capacitor charger circuit you send erlyer you don’t need a transformer (or ac connection).
Let me know when you get it working, and the multi-stage version J nice that you want to qote me, remember to use the new link;)
Q:
It's just a question about the : relays what is their part number? I am strugling with finding these relays :s (at least who is the manufacturer).
A:
I don’t have a part number of manufacturer, but that doesn’t matter. It depends on the circuit voltage, in my case 5V. buy any relay that works on 5 or 6V that has 2 separate contacts. Take a high amperage rating +- 10A.
Q: Will this relay do it?
A:
that relay will do fine, it all depends on your charge current.
I am now working on an improvement of my gun, I m going to replace the power relays with 17A versions and use 4x 1000W halogen tubes as charging resistor. Hopefully this will reduce charge time to 2sec or lower J.
Q: I put my schematics for the 2 stage coilgun
but for the components i just want to check (it's the same systeme as yours)
the 4 D1
D2 :
R1
R2
Thyristor
relays (they are CO single contact (one position for the charge one discharge(it's cheaper :D))
A:
Im not sure about the thyristor, I don’t know if 400A is enough. But the thyristor I used is pure overkill;)
The other components will work fine, with that relay and rectifier you can charge the capacitor bank very fast.
Q:
maybe this thyristor will be enough :)
What type of bobin did you use (1 or 2 mm?) were did you find it?
I am going to use a basic resistor for the charging systeme (about 50 to 150 ohm) what wattage should i use?
A:
I think that thyristor will do great, and it’s pretty small too. The bobin is about 100T 2mm wire.
Calculate the resistor wattage using ohms law, p=u*I = u^2/r. with 50 ohms the resistor should be around 1058W (230v), but the time it actually dissipates that amount of energy is very short. So a 250w or maybe 100w will work too.
Charge time for 8000uf would be 5*50*(8000*10^-6)= 2 seconds
Peak current would be I=umax/r = 6.5Amps
If I could sell 1 or 2 a month of these, that would be perfect. Im still at school, so at least I can make some money this way. I’m afraid it will be more that 300usd, more likely double that amount. (4 new capacitors of 2200uf 400v are already over 200 dollar).
Q:
Here are my capacitors :D only 1 for 8000uF
A:
That is one big capacitor:D
Q:
Just a question : where did you find your coil? because i dont find one with 2mm :s
A:
I found my coil laying around, no manufacturer or anything.
2.00 isn’t specifically required, but I recommend 1.8-2.2mm. if you can find/order some coil wire you can wind it yourself, to your own specifications.
Q: Finally i am goign to use this thyristor, pretty much more efficient and easy to handle (the other was i think to little)
And look this , it seem'sto bemore popular than i thik but the most important is advert :D
A:
That wire will do the job, a little bigger would be best for large projectiles.
The thyristor is better, it has a higher peak current rating, but it’s also more expensiveL.
Q:
What did you use to make the conexions between the elements? Because i don't think we can use soldering
A:
I stripped the wire from insulation, and bent it into a loop. I flattened the wire with a hammer/file to increase contact surface, and used a screw-washer-nut combination to force the wires together. Make sure the copper is in good contact with each other, after that you can pour solder in if you want. But you are right when you think solder alone isn’t enough, I actually had one solder connections explode with one of my tests.
-----------------------------------------------------------------------------
Q:
Ik ben van plan om aan de hand van jouw MV CoilMaster Mark1 CoilGun een coilgun te gaan bouwen.
Nu heb ik een paar vraagjes over de onderdelen.
Ik heb een 500w lamp betekend dit automatisch dat hij ongeveer 3 keer zo snel laad?
Op je website vertel je dat je ongeveer 100euro in dit project hebt gestoken. Nu ben ik op zoek gegaan naar condensatoren en daar alleen al ben ik tegen de 200euro aan kwijt. Heeft u een adres waar ik ze goed koper zou kunnen krijgen? En zo niet ik ben tegen een 8800uf 400v aangelopen die redelijk te betalen was laad deze langzamer?
Laatste vraag hoe dik is de loop die jet gebruikt hebt en waart vind ik die?
A:
Leuk dat je ook een coilgun gaat maken, is het voor een project van school of voor hobbydoeleinden?
Een goed idee om een 500w lamp te gebruiken, van die halogeenbuisjes zeker? Dat laad idd veeel sneller. Je zou ook kunnen overwegen er 2 of 3 parallel te zetten. Misschien dat ik die aanpassing wel op mijn geweer maak.
De 100 euro die ik in dit project gestoken heb zijn voornamelijk schroefjes en plexiglas plaatmateriaal, de condensatoren en thyristor kwamen bij school vandaan (bij de opruiming). Als het een schoolproject is kan je vragen of je nieuwe mag bestellen, die zijn wel veel beter (deze zijn 20 jaar oud). Je zou ze op 2ehands sites kunnen vinden of elektronica dumpwinkels.
Mijn loop is 16mm slagvast pvc installatiebuis J
Mocht je nog meer vragen hebben, laat het maar weten, vanaf het volgende blok ben ik ook weer dagelijks op school te vinden.
Met vriendelijke groet,
Q:
Het project is helaas niet voor school. Dat had qua kosten en tijd natuurlijk net iets gunstiger geweest.
Eigenlijk dacht ik gewoon aan een gloeilamp 500W 230V E40. Maar die halogeen buisjes zijn denk ik beter. Ze nemen in ieder geval minder ruimte in beslag. Ik heb nog wel een paar flits lampjes van weg werp camera’s liggen. Daar ga ik het is mee proberen. Hoe kan ik die lampjes het besten meten? Gewoon ouderwets een batterij er op en met de multimeter aan de slag?
Ik heb een beetje gezocht op ebay en kwam dit tegen.
http://cgi.ebay.com/1000uF-450V-Radial-Electrolytic-Capacitors-10-PCS-105_W0QQitemZ160394059952QQcmdZViewItemQQptZLH_DefaultDomain_0?hash=item25583b20b0
Op zich een goede deal leek (+-30 euro) mij alleen wordt mijn gun dan een beetje groot maar dat kan er ook wel leuk uit zien. Doen?
Wat voor sites bedoel je met elektronica dumpwinkels? Of bestaan die niet online?
A:
Ik bedoelde eigenlijk van die halogeen bouwlamp buizen, ze zijn een stuk langer maar nemen idd minder ruimte in dan een gloeilamp.
Die caps van ebay zijn een stuk kleiner dan die blauwe van mij 50x 110 mm, en je hebt dan een hogere capaciteit en spanning. Ik zou zeggen doen! Meer condensators parallel is ook beter ivm interne weerstand. Met 10.000uf op 450V zit je op 1012,5Joule, daar moet je toch wel iets leuks mee kunnenJ
Online winkels zijn baco-army-goods.nl en dickbest.nl er is ook een winkel die heet quackelstein oid, die schijnt heel veel te hebben.
Q: Hartstikke bedankt voor al je hulp. Ik heb erg veel zin in dit project. Zoveel dat ik zelfs nu nog naar onderdelen aan het zoeken ben.
Mocht ik ergens niet uit komen of wanneer er boeiende ontwikkelingen zijn dan hoor je van me.
A:
Haha herkenbaarJ hou me op de hoogte voor verdere ontwikkelingen!
Ik rekende net uit dat met 2 halogeenbuizen van 500W parallel mijn laadtijd van 14 sec naar 2,1 sec gaat (aan de hand van de rc tijd) nu is dit relatief omdat je laad met ac gelijkgericht maar tochJ. Ik rekende dit overigens uit met de warme weerstand van de halogeen buizen, maar in werkelijkheid worden ze denk ik niet eens warm dus gaat het nog sneller. Alleen is het relais wat ik gebruikt heb maar geschikt voor een laadstroom van 3A, dus ik kan het niet makkelijk aanpassen.
Als je met testschieten begint kan je mijn snelheidsmeter wel lenen, dat is een stuk beter finetunen dan met 5 lagen karton en kijke hoe diep hij komt;) je kan het best eerst een ‘open’ opselling maken, om te zien welke spoel / capaciteit / projectiel en afstand tot de spoel het meest ideaal is. Daarna kan je makkelijker een behuizing ontwerpen wat op een geweer lijkt.
-----------------------------------------------------------------------------
Q:
I'm an amateur experimenter though i mostly deal with non-electrical devices along the lines of rocket engines etc. but I've always been interested in building a coilgun. I just had a few questions, how exactly do you shut off the current when then projectile reaches the center of the coil, are there contacts so the projectile completes a circuit or am i missing something? Also, I was wondering about the feasibility of building a multi-stage coil gun in more of a rifle configuration, if the power supply needed would make it unwieldy or if it would just be a matter of a longer charge time or switching the current to the next coil? im gathering information right now and thinking about trying to build a larger rifle configuration with a higher muzzle velocity, comparable to that of a small rifle.
A:
With my coilgun, the current doesn't get switched off. I tried different capacitors and coils to get a 'good' working configuration. For this configuration, the coil and capacitor bank have to be tuned together. This is less efficient than switching the current off at the right time, but it is my first coilgun so that doesn’t bother me very much;)
A multi stage gun is possible, but you need more capacitors (heavy), and you need to time each coil with an optic sensor.
One option is to use smaller projectiles, you need multiple stages to get the energy of the capacitor bank in the projectile, because there is less material to magnetize. But muzzle velocity would be higher, and kinetic energy roughly the same.
The capacitors are the limiting factor, you want as many joules stored as possible with a very low internal resistance (equals high voltage capacitors, 300V+). Charging them isn’t really a big problem, but they take a lot of space.
-----------------------------------------------------------------------------


")
")
